
Dumpy Level Survey for profile leveling and contouring QGEO
About the Instrument Dumpy Level: Difference between Dumpy level and Auto level: Common Use of Dumpy Level Instrument: Components of Dumpy Level: 1.Telescope: a. Eyepiece: b. Focusing screw: c. Object lens and Diaphragm: d. Ray shade 2. Compass: 3. Bubble tubes: 4. Foot screws: 5. Horizontal plate fixing screw: 6. Tripod: Know about the Staff:

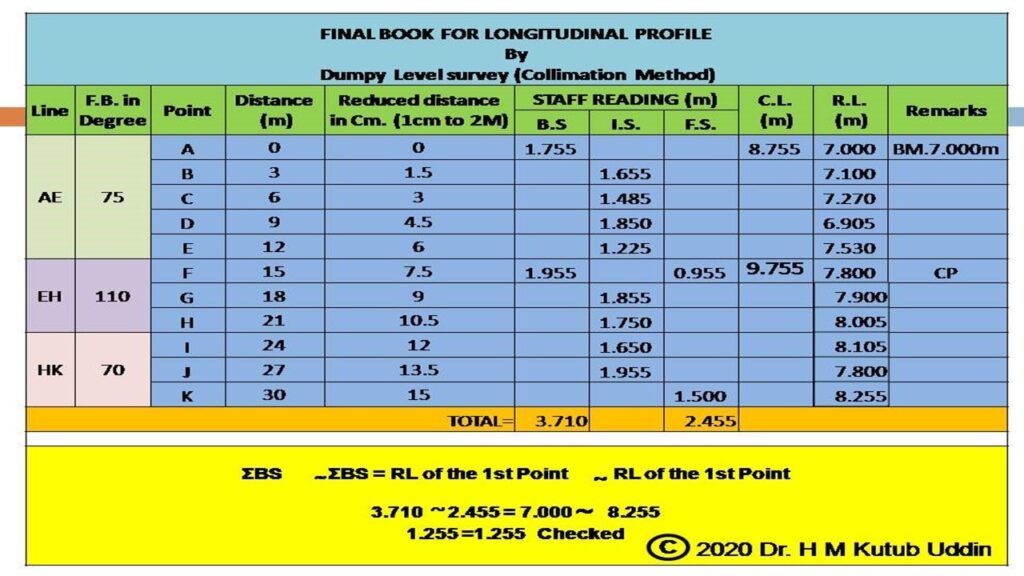
How to Find RL In Auto Level How to Calculate RL Dumpy Level Survey Auto Level Survey
A dumpy level, also known as an automatic level or builder's level, is a tool used to determine the elevation of landmasses. Though they may appear intimidating or confusing, dumpy levels are relatively simple to use once you understand how to set them up and what types of measurements they provide.

How to Use a Dumpy Level 14 Steps (with Pictures) wikiHow
The dumpy level is an optical surveying leveling instrument consisting a telescope tube firmly secured in two collars fixed by adjusting screws to the stage by the vertical spindle. The telescope of dumpy level can rotate only in a horizontal plane. Relative elevation of different points of a surveying land is determined with dumpy level.
How To Use A Dumpy Level With Full Example Surveying & Architects
Learning Objectives. Explain types of site surveys and their components, including construction surveys, bench marks, datum, and mean sea level. Explain types of earthwork operations, including pioneering, grubbing, stripping, and drainage. Describe types of leveling instruments and their uses. Interpret readings from a leveling rod.

How to use Dumpy Level for Excavation of Sloping Ramp YouTube
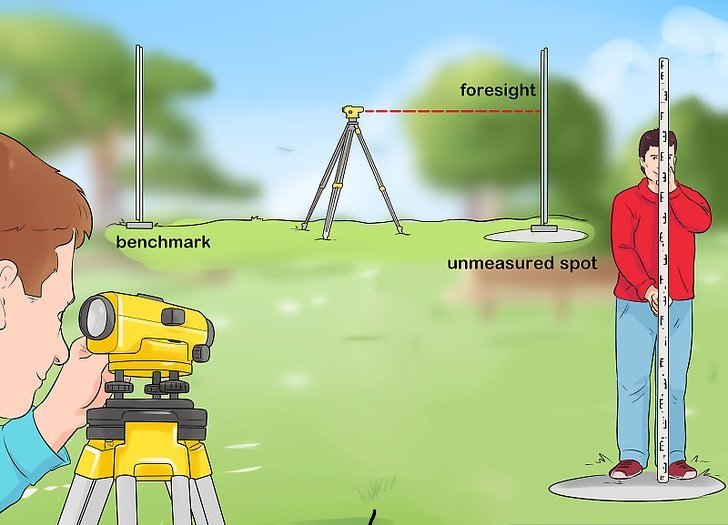
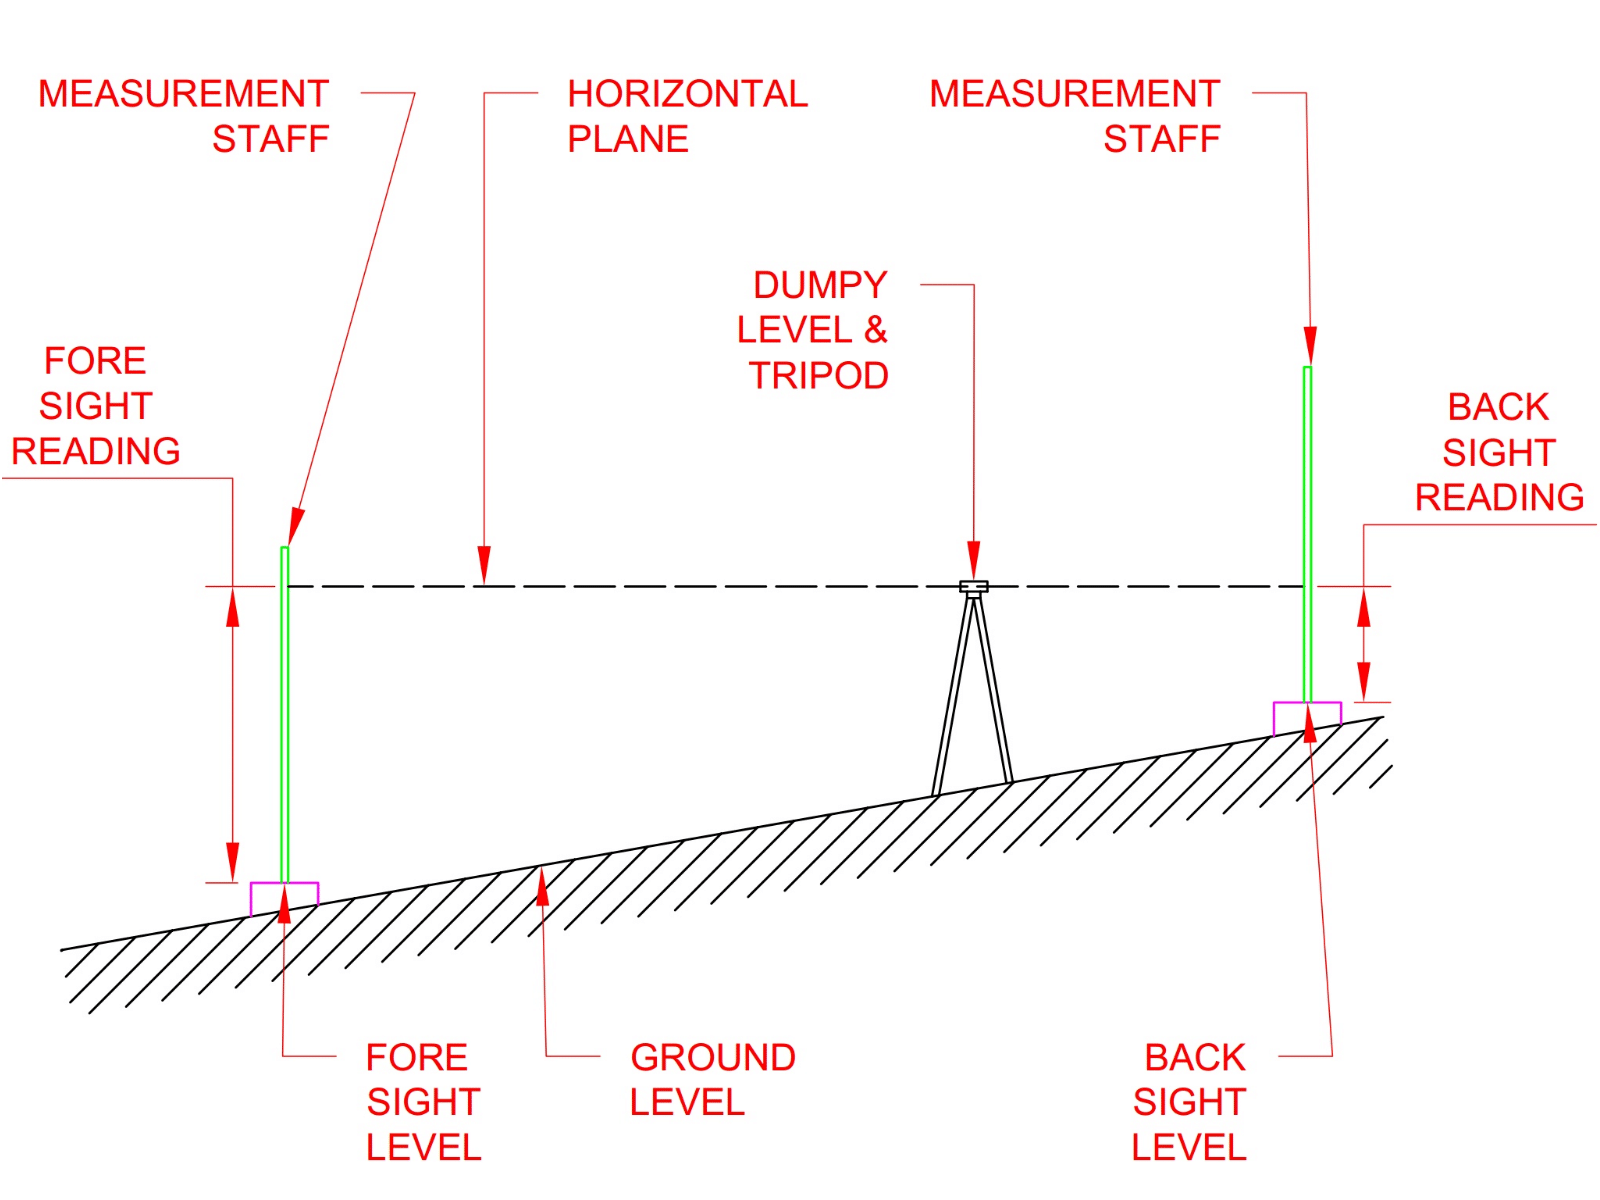
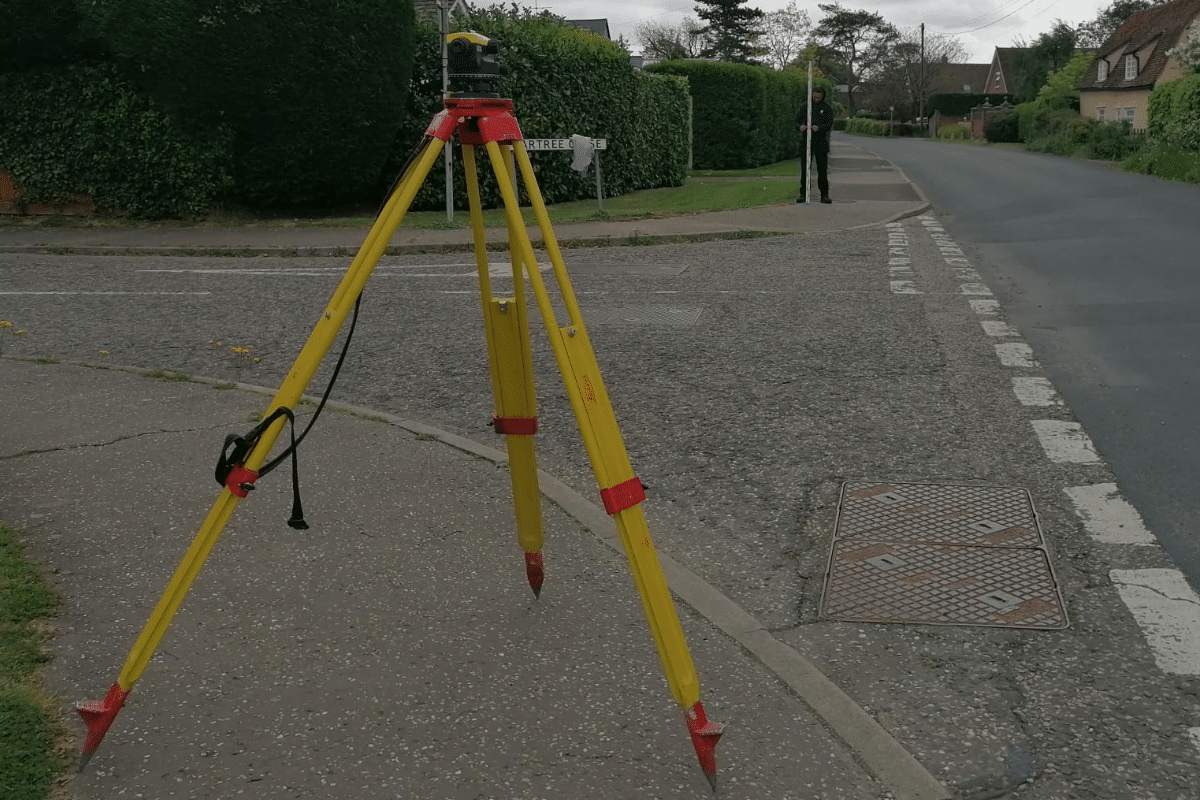
A dumpy level is a device that can be set to a very accurate horizontal plane, allowing precise height measurements to be taken when using a measurement staff. The key principle of a dumpy level is that it is set perfectly horizontal. This allows accurate vertical measurements to be taken.

How to Use a Dumpy Level 14 Steps (with Pictures) wikiHow
Step 1: Set Up the Dumpy Level. Step 2: Determine the Height of the Starting Point. Step 3: Move the Instrument to the Next Point. Step 4: Repeat the Process for Each Point. Step 5: Create a Map. FAQ's: To use a dumpy level for surveying, first place the tripod on a flat, level surface and attach the telescope to it.
6 dumpy levels. example of use
How to Use Dumpy Level | RL calculation | Surveying | Levelling | Auto Level | Dumpy Level | Staff ReadingDownload All Civil Engineering Excel Sheet: https:/.
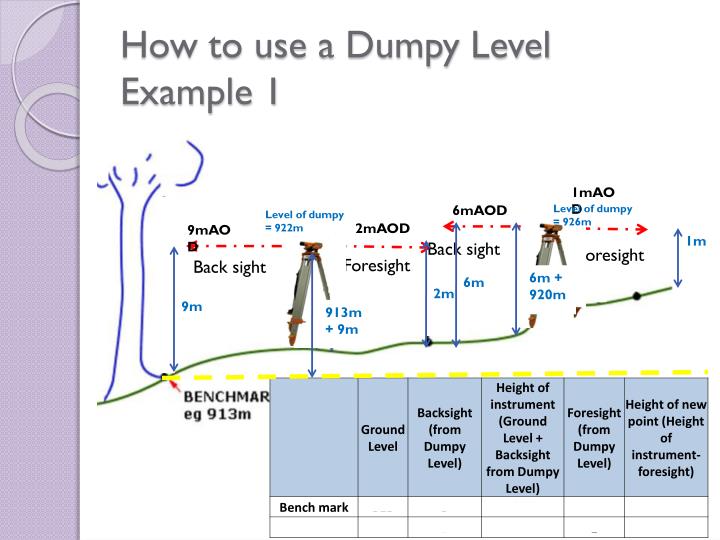
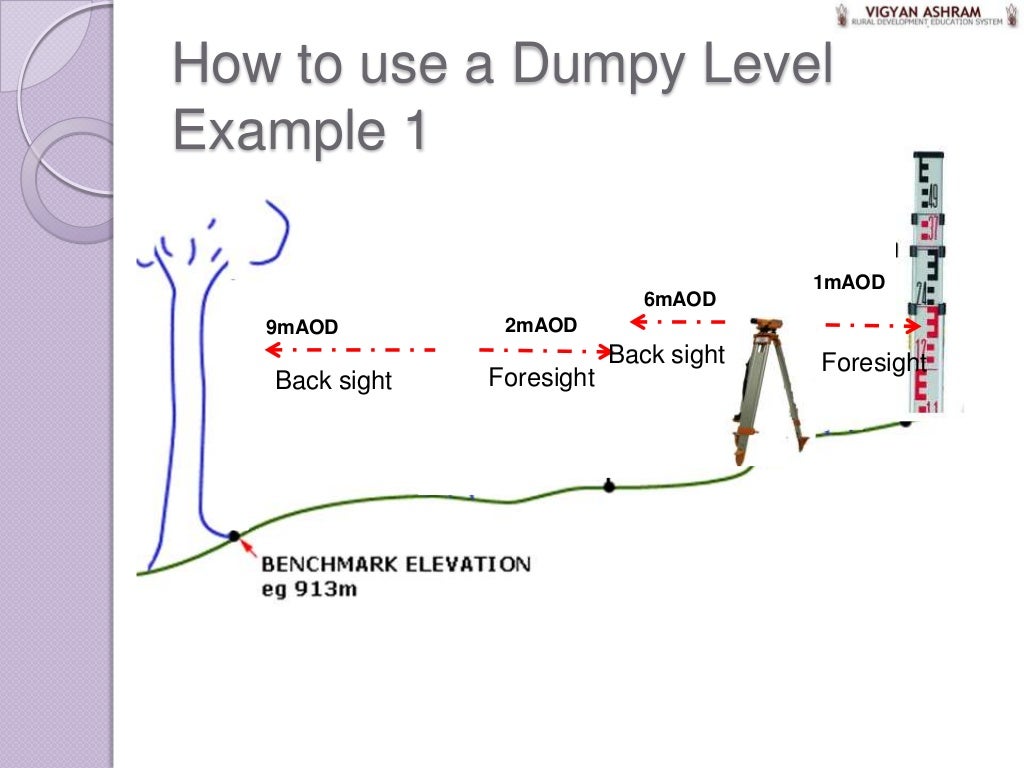
PPT How to use a Dumpy Level Example 1 PowerPoint Presentation ID3064942
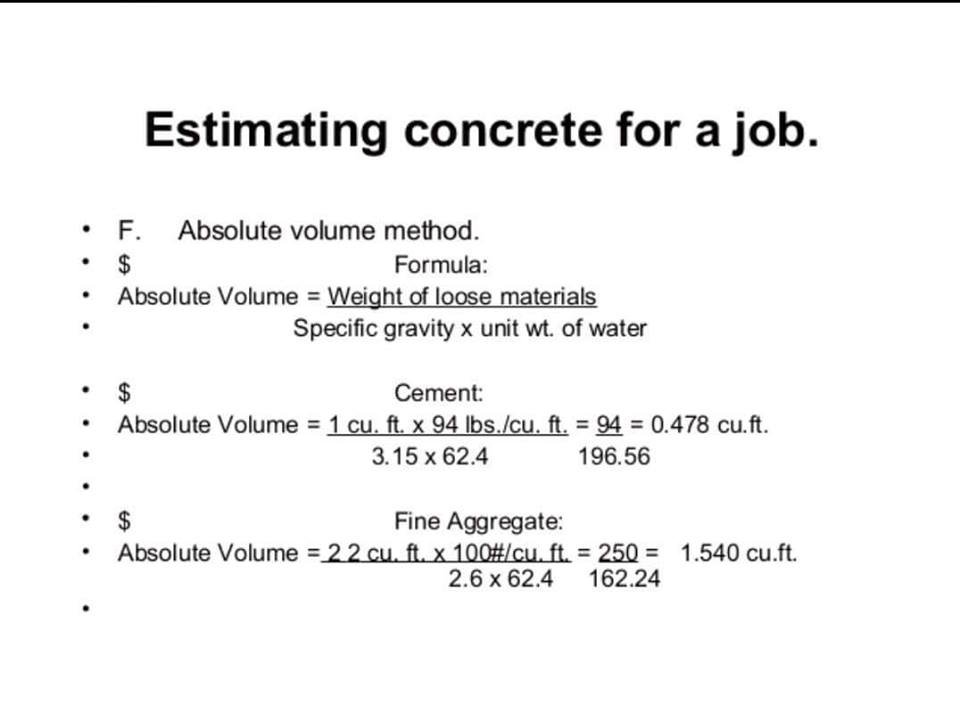
The dumpy level may be an optical instrument for surveying and leveling operations. It contains a telescope tube firmly placed between two collars and adjusting screws. The vertical spindle presents the complete device.. Calculation: The height difference is calculated by subtracting the staff reading from the instrument height.

Levelling in Surveying Using Dumpy Level » Engineering Basic
How to Level using DUMPY LEVEL | Civil engineering Surveying A dumpy level, builder's auto level, leveling instrument, or automatic level is an optical instrument used to establish or.

Dumpy Level Survey for profile leveling and contouring QGEO
In this video, you will learn how to measure the RL of point by using a dumpy level and auto level. Also how to calculate the level of any point on the groun.
Using a Surveying Dumpy Level A StepbyStep Guide
How to use dumpy level || Dumpy level || Auto level || surveying in civil engineering || 20234surveying leveling calculations 2023How to shift dumpy level st.
How To Use A Dumpy Level With Full Example
A dumpy level, also known as an automatic level or builder's level, is a tool designed to find the height of land masses. Though these devices may look intimidating or confusing, dumpy levels are fairly easy to use once you know how to set them up and what kinds of measurements they provide. Part 1 Setting up Your Level Download Article 1
Using a Surveying Dumpy Level A StepbyStep Guide
Step 1 Measure out a 60-metre line on a relatively flat piece of ground. Mark the ends of the line with a timber stake (or nail, or spray mark) and securely hammer them into the ground, so they are nice and solid. Step 2 Set up your dumpy level halfway between each of the pegs (30 metres along the line).

Dumpy Level Survey for profile leveling and contouring QGEO
having to redo all your level calculations. Now set up your dumpy level. It will probably be like the one pictured, and has an eyepiece, bulls-eye spirit level and 3 levelling screws as well as a focus for the telescope lens - quite often the base has a 360 degree compass, for laying out, however as you now know how to create perfect right
Dumpy Level Survey for profile leveling and contouring QGEO
Take an accurate reading of a1 and b1 (see diagram). Next move the tripod and dumpy so that it is 2m from staff A, level and take readings a2 and b2. Perform the following calculation; b2i=a2-(a1-b1) If the result (b2i) is equal to the reading for b2 then the dumpy is calibrated. (Note: a1-b1 could be a negative, in this situation you add this.

How to Use Dumpy Level RL calculation Surveying Levelling Auto Level Dumpy Level
Dumpy level is commonly used leveling instrument to locate the points in same horizontal plane. It is also called as automatic level or builder's level. Elevations of different points and distance between the points of same elevation can be determined by dumpy level.